
It’s time to chop and prop - propagate that is!
Hi everyone, I’m Corina from @mostly.variegated here to talk to you about how to propagate plants. I love to propagate my plants to trade and share with my friends, and I’d like to help you do the same!

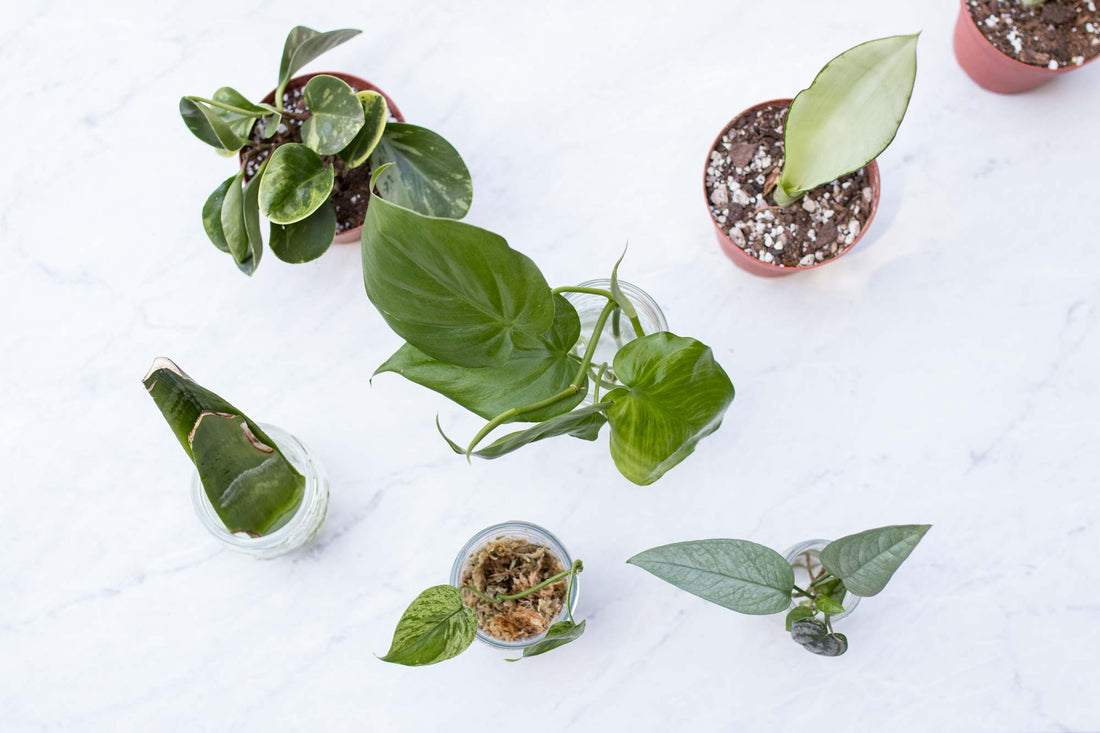
Today I’ll discuss propagation tips and tricks for 3 different types of plants: a trailing philodendron plant, a bushy peperomia plant, and a spreading snake plant.
The first step is to determine the best propagation technique for your plant, and then just dive in and get started! Before you begin, you’ll want to collect some supplies and have everything you need for your new plant.
Supplies for pre-chopping:
- Sharp clippers, scissors, or a knife (clean with isopropyl alcohol before using)
- A propagation vessel (such as a glass jar) with water or damp sphagnum moss
- Alternatively, rooting hormone (powder or gel), a clean nursery pot with drainage holes, and fresh soil
Now that you have your supplies and are ready to turn one plant into many, it’s time to get chopping!
Let’s start with one of the most popular trailing plants, the Philodendron Cordatum aka Green Heart Leaf. I got this plant from IvyMay Co and it is such a perfect and easy plant to propagate. Philodendrons are fast growers, easy to root, and can grow in many conditions which makes them perfect to share with your friends, even if they aren’t crazy plant parents (yet!)
To determine where to make your first chop, you’ll want to identify the nodes. Nodes are the intersections on the stem where roots and leaves pop out, and this is also where new growth points will form.
Make your cut on the stem - in the middle between two nodes; this will give you extra stem just in case your cuttings start to rot so you can cut the rot off and still keep your node safe. Vining plants like philodendrons, pothos, and tradescantia are very easy to propagate in either water or sphagnum moss - here are two examples of different plants that I have been propagating in water and moss for the last few weeks.

If you choose to propagate in water, you’ll want to use fresh water (tap is fine) and be sure your vessel is big enough that you can get at least 1 or 2 nodes into the water. Remember, nodes are where the roots will grow from, so having just the end of the stem in the water won’t be enough. Be sure to change the water weekly to keep it fresh and prevent stem rot!
If you choose to propagate in moss, you’ll want to find some sphagnum moss at your local nursery (it normally comes dried). To wet it, simply put some moss into a dish of water and allow it to soak for 15-30 minutes. For an extra boost, I like to soak my moss in ½ strength diluted SuperThrive nutrients, as this will help the plant get going once it has started to form roots. When you are ready to put your cuttings into the moss, select a clear container (such as a glass mason jar, or reuse a plastic boba cup), take the moss out of the water and gently squeeze the water out of the moss, and place a layer of moss into the vessel. The moss should be damp, but not wet. You can then place your cutting into the moss, and layer extra moss around the stem ensuring that you cover at least 1-2 nodes with moss. Check the moss every 5-7 days to ensure it is still damp, and add some extra water as needed.

When you see roots growing that are about 2-3” long, you’ll know they are ready to plant. Choose a pot that is appropriately sized for your plants roots, keeping in mind that smaller pots are better than bigger pots for plants that are not yet established.
Peperomia Obtusifolia: how to chop your plant if it grows upright on a stalk

Following the steps above (seriously, clean those shears), you can propagate these in water or moss as well, but I’ll also show you how I propagate them directly into soil using a rooting hormone powder.
Place your soil into your pot, leaving it loose and airy and set it aside so it’s ready.

After locating the nodes and making your cut, apply the rooting hormone. Stick the end of your plant up to the first node into the rooting hormone and then lightly tap off any extra. A little bit goes a long way! Gently stick the end of your plant into the loose soil, and lightly tap the soil down to hold it in place. Add a bit of extra soil to the top if needed, and water thoroughly. After 2-4 weeks, you can check to see if your plant is rooted by gently pulling on the stem - if it moves, it’s not rooted yet, but once it has roots you’ll notice some resistance. Once you feel it has started to root, you can water it with ½ strength diluted nutrients (SuperThrive or Liquid Dirt work really well for helping new plants establish a strong root system). Water lightly every 5-7 days to keep the soil moist, but not soaking wet, until it has a more established root system.

Moonshine Snake Plant: how to propagate plants with rhizomes

Clean your clippers and prepare a pot with fresh soil as described above.
When you notice your snake plant has little babies popping up around it, you can either leave them there for a more full pot, or take them out to create new plants.

To separate them, this technique is called division, take the entire plant out of the pot and gently remove the soil around the baby plants. If there are a lot of roots, you can dip the plant into a bucket of water to help remove excess soil and use your fingers to loosen the root ball. You’ll see that the babies are connected to the mother plant underneath the soil. Cut the baby to remove it, allowing the baby to take as many roots with it as possible. Once you have the baby separated, you can gently plant it into your prepared pot, planting it to the same depth that it was previously. Add extra soil to the top if needed and lightly water, but do not soak the plant as snake plants do not like excess moisture in their pots.

Another way to propagate snake plants if you do not have babies coming up is by leaf propagation. Simply cut off a leaf, and place it into a vessel of water. Please note that this method is not 100% successful and may take longer than other plants to develop roots, but with time and patience it will eventually first sprout roots, and then it’ll start sending up little baby snake plants too!
Place all of your propagations in bright, indirect light, and enjoy your new plant babies!
13 comments
https://sites.google.com/view/movers-riyadh/
https://sites.google.com/view/movers-riyadh/movers-mecca
https://sites.google.com/view/movers-riyadh/home
https://sites.google.com/view/movers-riyadh/movers-jedaah-elhamdniah
https://sites.google.com/view/movers-riyadh/movers-yanbu
https://sites.google.com/view/movers-riyadh/movers-najran
https://sites.google.com/view/movers-riyadh/movers-Jizan
https://sites.google.com/view/movers-riyadh/jazan
https://sites.google.com/view/movers-riyadh/taif
https://sites.google.com/view/movers-riyadh/moversjeddah
https://sites.google.com/view/movers-riyadh/movers-abha
https://sites.google.com/view/movers-riyadh/movers-elahsa
https://sites.google.com/view/movers-riyadh/movers-elkhobar
https://sites.google.com/view/movers-riyadh/movers-elkharj
https://sites.google.com/view/movers-riyadh/movers-elmadina-elmnowara
https://sites.google.com/view/movers-riyadh/movers-eljubail
https://sites.google.com/view/movers-riyadh/movers-elqassim
https://sites.google.com/view/movers-riyadh/movers-hafrelbatin
https://sites.google.com/view/movers-riyadh/movers-elbaha
https://sites.google.com/view/movers-riyadh/movers-jeddah
https://sites.google.com/view/movers-riyadh/movers-dammam
https://sites.google.com/view/movers-riyadh/movers-taif
https://sites.google.com/view/movers-riyadh/movers-burydah
https://sites.google.com/view/movers-riyadh/movers-tabuk
https://sites.google.com/view/movers-riyadh/movers-hail
https://sites.google.com/view/movers-riyadh/movers-khamis-mushait
https://sites.google.com/view/movers-riyadh/movers-rabigh
https://sites.google.com/view/movers-riyadh/madina
https://sites.google.com/view/movers-riyadh/mecca
https://sites.google.com/view/movers-riyadh/dammam
https://sites.google.com/view/movers-riyadh/jeddah
https://sites.google.com/view/movers-riyadh/ahsa
https://sites.google.com/view/movers-riyadh/cleaning-mecca
http://fullservicelavoro.com/ شركة ريلاكس لنقل العفش والاثاث
http://fullservicelavoro.com/2019/01/07/transfer-movers-taif-furniture/ شركة نقل عفش بالطائف
http://fullservicelavoro.com/2019/01/08/transfer-movers-riyadh-furniture/ شركة نقل عفش بالرياض
http://fullservicelavoro.com/2019/01/08/transfer-movers-jeddah-furniture/ شركة نقل عفش بجدة
http://fullservicelavoro.com/2019/01/01/transfer-and-movers-furniture-mecca/ شركة نقل عفش بمكة
http://fullservicelavoro.com/2019/01/07/transfer-movers-madina-furniture/ شركة نقل عفش بالمدينة المنورة
http://fullservicelavoro.com/2019/01/07/transfer-movers-khamis-mushait-furniture/ شركة نقل عفش بخميس مشيط
http://fullservicelavoro.com/2019/01/09/transfer-movers-abha-furniture/ شركة نقل اثاث بابها
http://fullservicelavoro.com/2019/01/07/transfer-movers-najran-furniture/ شركة نقل عفش بنجران
http://fullservicelavoro.com/2019/01/16/transfer-movers-hail-furniture/ ِشركة نقل عفش بحائل
http://fullservicelavoro.com/2019/01/16/transfer-movers-qassim-furniture/ شركة نقل عفش بالقصيم
http://fullservicelavoro.com/2019/02/02/transfer-movers-furniture-in-bahaa/ شركة نقل عفش بالباحة
http://fullservicelavoro.com/2019/01/13/transfer-movers-yanbu-furniture/ شركة نقل عفش بينبع
http://fullservicelavoro.com/2019/01/18/%d8%af%d9%8a%d9%86%d8%a7-%d9%86%d9%82%d9%84-%d8%b9%d9%81%d8%b4-%d8%a8%d8%a7%d8%a8%d9%87%d8%a7/ دينا نقل عفش بابها
http://fullservicelavoro.com/2019/01/13/%D9%86%D9%82%D9%84-%D8%A7%D9%84%D8%A7%D8%AB%D8%A7%D8%AB-%D8%A8%D8%A7%D9%84%D9%85%D8%AF%D9%8A%D9%86%D8%A9-%D8%A7%D9%84%D9%85%D9%86%D9%88%D8%B1%D8%A9-%D8%A7%D9%87%D9%85-%D8%B4%D8%B1%D9%83%D8%A7%D8%AA/ نقل الاثاث بالمدينة المنورة
http://fullservicelavoro.com/2019/01/12/%D8%A7%D8%B1%D8%AE%D8%B5-%D8%B4%D8%B1%D9%83%D8%A9-%D9%86%D9%82%D9%84-%D8%B9%D9%81%D8%B4-%D8%A8%D9%85%D9%83%D8%A9/ ارخص شركة نقل عفش بمكة
http://fullservicelavoro.com/2019/01/07/transfer-movers-elkharj-furniture/ شركة نقل عفش بالخرج
http://fullservicelavoro.com/2019/01/07/transfer-movers-baqaa-furniture/ شركة نقل عفش بالبقعاء
http://fullservicelavoro.com/2019/02/05/transfer-furniture-in-jazan/ شركة نقل عفش بجازان
شركة كيان لنقل العفش بالرياض والمدينة المنورة وجدة ومكة والطائف والدمام تقديم لكم دليل كامل لشركات نقل العفش بالمملكة العربية السعودية
http://mycanadafitness.com/ شركة كيان لنقل العفش
http://mycanadafitness.com/forum.html منتدي نقل العفش
http://mycanadafitness.com/movingfurnitureriyadh.html شركة نقل اثاث بالرياض
http://mycanadafitness.com/movingfurniturejaddah.html شركة نقل اثاث بجدة
http://mycanadafitness.com/movingfurnituremecca.html شركة نقل اثاث بمكة
http://mycanadafitness.com/movingfurnituretaif.html شركة نقل اثاث بالطائف
http://mycanadafitness.com/movingfurnituremadina.html شركة نقل اثاث بالمدينة المنورة
http://mycanadafitness.com/movingfurnituredammam.html شركة نقل اثاث بالدمام
http://mycanadafitness.com/movingfurniturekhobar.html شركة نقل اثاث بالخبر
http://mycanadafitness.com/movingfurnituredhahran.html شركة نقل اثاث بالظهران
http://mycanadafitness.com/movingfurniturejubail.html شركة نقل اثاث بالجبيل
http://mycanadafitness.com/movingfurnitureqatif.html شركة نقل اثاث بالقطيف
http://mycanadafitness.com/movingfurnitureahsa.html شركة نقل اثاث بالاحساء
http://mycanadafitness.com/movingfurniturekharj.html شركة نقل اثاث بالخرج
http://mycanadafitness.com/movingfurniturekhamismushit.html شركة نقل اثاث بخميس مشيط
http://mycanadafitness.com/movingfurnitureabha.html شركة نقل اثاث بابها
http://mycanadafitness.com/movingfurniturenajran.html شركة نقل اثاث بنجران
http://mycanadafitness.com/movingfurniturejazan.html شركة نقل اثاث بجازان
http://mycanadafitness.com/movingfurnitureasir.html شركة نقل اثاث بعسير
http://mycanadafitness.com/movingfurniturehail.html شركة نقل اثاث بحائل
http://mycanadafitness.com/movingfurnitureqassim.html شركة نقل عفش بالقصيم
http://mycanadafitness.com/movingfurnitureyanbu.html شركة نقل اثاث بينبع
http://mycanadafitness.com/movingfurnitureburaidah.html شركة نقل عفش ببريدة
http://mycanadafitness.com/movingfurniturehafralbatin.html شركة نقل عفش بحفر الباطن
http://mycanadafitness.com/movingfurniturerabigh.html شركة نقل عفش برابغ
http://mycanadafitness.com/movingfurnituretabuk.html شركة نقل عفش بتبوك
http://mycanadafitness.com/movingfurnitureasfan.html شركة نقل عفش بعسفان
http://mycanadafitness.com/movingfurnituresharora.html شركة نقل عفش بشرورة
http://mycanadafitness.com/companis-moving-riyadh.html شركات نقل العفش بالرياض
http://mycanadafitness.com/cars-moving-riyadh.html سيارات نقل العفش بالرياض
http://mycanadafitness.com/company-number-moving-riyadh.html ارقام شركات نقل العفش بالرياض
http://mycanadafitness.com/company-moving-jeddah.html شركات نقل العفش بجدة
http://mycanadafitness.com/price-moving-jeddah.html اسعار نقل العفش بجدة
http://mycanadafitness.com/company-moving-mecca.html شركات نقل العفش بمكة
http://www.domyate.com/2019/08/27/transfer-furniture-north-riyadh/ نقل عفش شمال الرياض
http://www.domyate.com/2019/09/05/movers-company-khamis-mushait/ شركات نقل عفش بخميس مشيط
http://www.domyate.com/2019/09/05/10-company-transfer-furniture-khamis-mushait/ شركة نقل العفش بخميس مشيط
http://www.domyate.com/2019/09/05/all-transfer-furniture-khamis-mushait/ شركات نقل اثاث بخميس مشيط
http://www.domyate.com/2019/09/05/best-company-transfer-furniture-khamis-mushit/ افضل شركات نقل اثاث بخميس مشيط
http://www.domyate.com/2019/09/05/company-transfer-furniture-khamis-mushit/ شركات نقل اثاث بخميس مشيط
http://www.domyate.com/category/%D9%86%D9%82%D9%84-%D8%B9%D9%81%D8%B4-%D8%AC%D8%AF%D8%A9/ نقل عفش جدة
http://www.domyate.com/2019/09/25/movers-furniture-from-jeddah-to-jordan/ نقل عفش من جدة الي الاردن
http://www.domyate.com/2019/10/03/price-cleaning-tanks-in-jeddah/ اسعار شركات تنظيف خزانات بجدة
http://www.domyate.com/2019/09/25/movers-furniture-from-jeddah-to-egypt/ نقل عفش من جدة الي مصر
http://www.domyate.com/2019/09/24/movers-furniture-from-jeddah-to-lebanon/ نقل عفش من جدة الي لبنان
http://www.domyate.com/2019/09/22/%d8%a3%d9%86%d8%ac%d8%ad-%d8%b4%d8%b1%d9%83%d8%a7%d8%aa-%d9%86%d9%82%d9%84-%d8%a7%d8%ab%d8%a7%d8%ab-%d8%a8%d8%ac%d8%af%d8%a9/ شركات نقل اثاث بجدة
http://www.domyate.com/2019/09/22/best-company-movers-jeddah/ افضل شركات نقل اثاث جدة
http://www.domyate.com/2019/09/22/company-transfer-furniture-yanbu/ شركات نقل العفش بينبع
http://www.domyate.com/2019/09/21/taif-transfer-furniture-company/ شركة نقل عفش في الطائف
http://www.domyate.com/2019/09/21/%d8%b4%d8%b1%d9%83%d8%a7%d8%aa-%d9%86%d9%82%d9%84-%d8%a7%d9%84%d8%b9%d9%81%d8%b4/ شركات نقل العفش
http://www.domyate.com/2019/09/21/%d8%b7%d8%b1%d9%82-%d9%86%d9%82%d9%84-%d8%a7%d9%84%d8%b9%d9%81%d8%b4/ طرق نقل العفش
http://www.domyate.com/2019/09/20/%d8%ae%d8%b7%d9%88%d8%a7%d8%aa-%d9%86%d9%82%d9%84-%d8%a7%d9%84%d8%b9%d9%81%d8%b4-%d9%88%d8%a7%d9%84%d8%a7%d8%ab%d8%a7%d8%ab/ خطوات نقل العفش والاثاث
http://www.domyate.com/2019/09/20/best-10-company-transfer-furniture/ افضل 10 شركات نقل عفش
http://www.domyate.com/2019/09/20/%d9%83%d9%8a%d9%81-%d9%8a%d8%aa%d9%85-%d8%a7%d8%ae%d8%aa%d9%8a%d8%a7%d8%b1-%d8%b4%d8%b1%d9%83%d8%a7%d8%aa-%d9%86%d9%82%d9%84-%d8%a7%d9%84%d8%b9%d9%81%d8%b4-%d9%88%d8%a7%d9%84%d8%a7%d8%ab%d8%a7%d8%ab/ اختيار شركات نقل العفش والاثاث
http://www.domyate.com/2019/09/20/cleaning-company-house-taif/ شركة تنظيف منازل بالطائف
http://www.domyate.com/2019/09/20/company-cleaning-home-in-taif/ شركة تنظيف شقق بالطائف
http://www.domyate.com/2019/09/20/taif-cleaning-company-villas/ شركة تنظيف فلل بالطائف
http://www.domyate.com/ شركة نقل عفش
http://www.domyate.com/2017/09/21/%D9%86%D9%82%D9%84-%D8%A7%D9%84%D8%B9%D9%81%D8%B4-%D9%88%D8%A7%D9%84%D8%AA%D8%AE%D8%B2%D9%8A%D9%86/ نقل العفش والتخزين
http://www.domyate.com/2016/07/02/transfer-furniture-dammam شركة نقل عفش بالدمام
http://www.domyate.com/2015/11/12/%D8%B4%D8%B1%D9%83%D8%A9-%D9%86%D9%82%D9%84-%D8%B9%D9%81%D8%B4-%D8%A8%D8%A7%D9%84%D9%85%D8%AF%D9%8A%D9%86%D8%A9-%D8%A7%D9%84%D9%85%D9%86%D9%88%D8%B1%D8%A9/ شركة نقل عفش بالمدينة المنورة
http://www.domyate.com/2016/06/05/transfer-furniture-jeddah/ شركة نقل عفش بجدة
http://www.domyate.com/2017/08/10/movers-company-mecca-naql/ شركات نقل العفش بمكة
http://www.domyate.com/2016/06/05/transfer-furniture-mecca/ شركة نقل عفش بمكة
http://www.domyate.com/2016/06/05/transfer-furniture-taif/ شركة نقل عفش بالطائف
http://www.domyate.com/2016/06/05/transfer-furniture-riyadh/ شركة نقل عفش بالرياض
http://www.domyate.com/2016/06/05/transfer-furniture-yanbu/ شركة نقل عفش بينبع
http://www.domyate.com/category/%D8%AE%D8%AF%D9%85%D8%A7%D8%AA-%D9%86%D9%82%D9%84-%D8%A7%D9%84%D8%B9%D9%81%D8%B4-%D9%88%D8%A7%D9%84%D8%AA%D8%AE%D8%B2%D9%8A%D9%86/ نقل العفش والتخزين
http://www.domyate.com/2015/08/30/furniture-transport-company-in-almadinah/ شركة نقل عفش بالمدينة المنورة
http://www.domyate.com/2016/06/05/transfer-furniture-medina-almonawara/ شركة نقل عفش بالمدينة المنورة
http://www.domyate.com/2018/10/13/%D9%86%D9%82%D9%84-%D8%B9%D9%81%D8%B4-%D8%AC%D8%AF%D8%A9-%D8%B4%D8%B1%D9%83%D8%A7%D8%AA-%D9%86%D9%82%D9%84-%D9%85%D9%85%D9%8A%D8%B2%D8%A9/ نقل عفش بجدة
http://www.domyate.com/2016/07/22/%d8%a7%d8%b1%d8%ae%d8%b5-%d8%b4%d8%b1%d9%83%d8%a9-%d9%86%d9%82%d9%84-%d8%b9%d9%81%d8%b4-%d8%a8%d8%a7%d9%84%d9%85%d8%af%d9%8a%d9%86%d8%a9-%d8%a7%d9%84%d9%85%d9%86%d9%88%d8%b1%d8%a9/ ارخص شركة نقل عفش بالمدينة المنورة
http://www.domyate.com/2016/07/25/%D8%B4%D8%B1%D9%83%D8%A9-%D9%86%D9%82%D9%84-%D8%B9%D9%81%D8%B4-%D8%A8%D8%A7%D9%84%D9%82%D8%B5%D9%8A%D9%85/ شركة نقل عفش بالقصيم
http://www.domyate.com/2016/07/25/%D8%B4%D8%B1%D9%83%D8%A9-%D9%86%D9%82%D9%84-%D8%B9%D9%81%D8%B4-%D8%A8%D8%AE%D9%85%D9%8A%D8%B3-%D9%85%D8%B4%D9%8A%D8%B7/ شركة نقل عفش بخميس مشيط
http://www.domyate.com/2016/07/25/%D8%B4%D8%B1%D9%83%D8%A9-%D9%86%D9%82%D9%84-%D8%B9%D9%81%D8%B4-%D8%A8%D8%A7%D8%A8%D9%87%D8%A7/ شركة نقل عفش بابها
http://www.domyate.com/2016/07/23/%D8%B4%D8%B1%D9%83%D8%A9-%D9%86%D9%82%D9%84-%D8%B9%D9%81%D8%B4-%D8%A8%D8%AA%D8%A8%D9%88%D9%83/ شركة نقل عفش بتبوك
شركة سكاي لخدمات نقل العفش والاثاث بالمنطقة العربية السعودية نحن نوفر خدمات نقل اثاث بالرياض ونقل عفش بالمدينة المنورة ونقل عفش بمكة ونقل عفش بالطائف نحن نقدم افضل نقل اثاث بخميس مشيط ونقل عفش بجدة
https://treeads.net/ شركة سكاي نقل العفش
https://treeads.net/blog.html مدونة لنقل العفش
https://treeads.net/movers-mecca.html شركة نقل عفش بمكة
https://treeads.net/movers-riyadh-company.html شركة نقل عفش بالرياض
https://treeads.net/all-movers-madina.html شركة نقل عفش بالمدينة المنورة
https://treeads.net/movers-jeddah-company.html شركة نقل عفش بجدة
https://treeads.net/movers-taif.html شركة نقل عفش بالطائف
https://treeads.net/movers-dammam-company.html شركة نقل عفش بالدمام
https://treeads.net/movers-qatif.html شركة نقل عفش بالقطيف
https://treeads.net/movers-jubail.html شركة نقل عفش بالجبيل
https://treeads.net/movers-khobar.html شركة نقل عفش بالخبر
https://treeads.net/movers-ahsa.html شركة نقل عفش بالاحساء
https://treeads.net/movers-kharj.html شركة نقل عفش بالخرج
https://treeads.net/movers-khamis-mushait.html شركة نقل عفش بخميس مشيط
https://treeads.net/movers-abha.html شركة نقل عفش بابها
https://treeads.net/movers-qassim.html شركة نقل عفش بالقصيم
https://treeads.net/movers-yanbu.html شركة نقل عفش بينبع
https://treeads.net/movers-najran.html شركة نقل عفش بنجران
https://treeads.net/movers-hail.html شركة نقل عفش بحائل
https://treeads.net/movers-buraydah.html شركة نقل عفش ببريدة
https://treeads.net/movers-tabuk.html شركة نقل عفش بتبوك
https://treeads.net/movers-dhahran.html شركة نقل عفش بالظهران
https://treeads.net/movers-rabigh.html شركة نقل عفش برابغ
https://treeads.net/movers-baaha.html شركة نقل عفش بالباحه
https://treeads.net/movers-asseer.html شركة نقل عفش بعسير
https://treeads.net/movers-mgmaa.html شركة نقل عفش بالمجمعة
https://treeads.net/movers-sharora.html شركة نقل عفش بشرورة
https://treeads.net/how-movers-furniture-yanbu.html كيفية نقل العفش بينبع
https://treeads.net/price-movers-furniture-yanbu.html اسعار نقل عفش بينبع
https://treeads.net/find-company-transfer-furniture-yanbu.html البحث عن شركات نقل العفش بينبع
https://treeads.net/transfer-furniture-khamis-mushit.html شركات نقل العفش بخميس مشيط
https://treeads.net/how-transfer-furniture-khamis-mushit.html كيفية نقل العفش بخميس مشيط
https://treeads.net/price-transfer-furniture-khamis-mushit.html اسعار نقل عفش بخميس مشيط
https://treeads.net/%D8%B4%D8%B1%D9%83%D8%A9-%D8%AC%D9%84%D9%8A-%D8%A8%D9%84%D8%A7%D8%B7-%D8%A8%D8%AC%D8%AF%D8%A9.html شركة جلي بلاط بجدة
https://treeads.net/%D8%B4%D8%B1%D9%83%D8%A9-%D8%AA%D9%86%D8%B8%D9%8A%D9%81-%D9%81%D9%84%D9%84-%D8%A8%D8%AC%D8%AF%D8%A9.html تنظيف فلل بجدة
https://treeads.net/company-transfer-furniture-jazan.html شركة نقل عفش بجازان
https://treeads.net/best-company-cleaning-jeddah-2020.html افضل شركة تنظيف بجدة